
We may earn money or products from the companies mentioned or linked to in this post, including Amazon Affiliate links
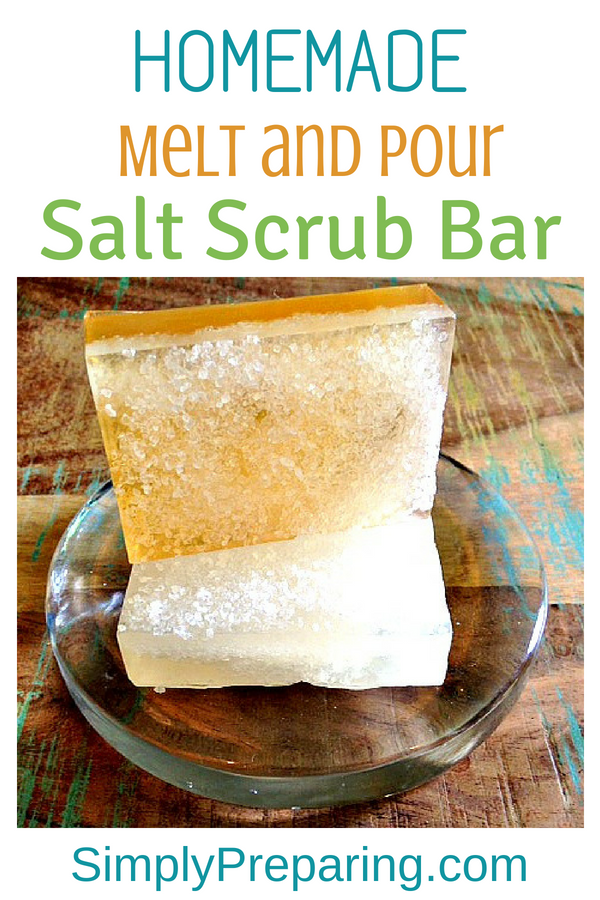
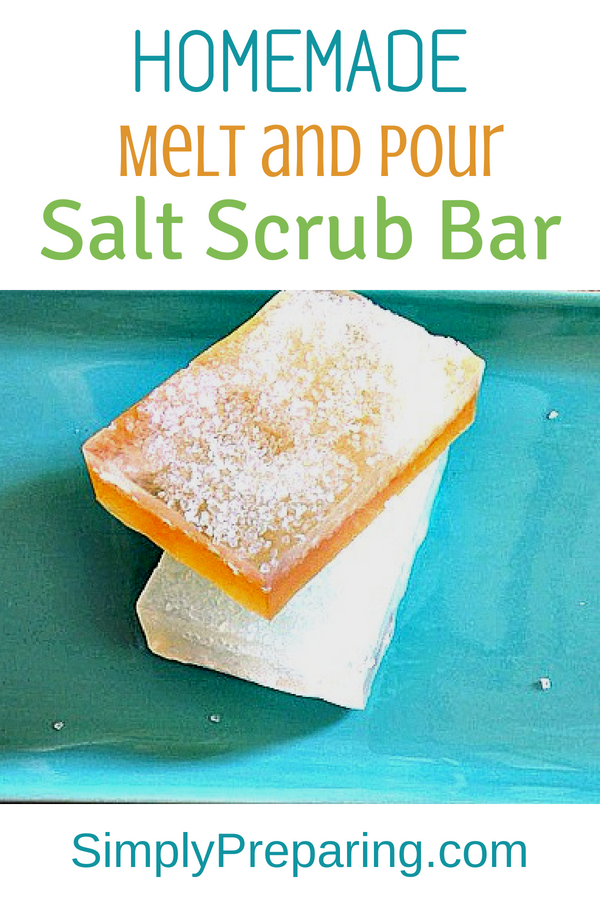
My Simple Melt and Pour DIY Salt Scrub Bars were created to give those winter dry and scratchy feet sandal worthy softness. Actually, this is a great bar of soap to grab anytime weary tootsies need a bit of revival. Not only are ingredients in this recipe are readily available, making these fun bars are as easy as it gets. Let me show you how!
Simple DIY Salt Scrub Bars
I chose a combination of coarse and extra coarse sea salt to make my DIY Salt Scrub Bars. I’ve seen larger hunks of salt used in these bars before, but that somehow seems really uncomfortable to me.
I love the two tone horizontal bar because it gives two options, one to scrub with, one to soften with. I specifically chose the honey base for the healing properties found in honey.
I’ve added shea to the honey side of this soap too. You could certainly add it to both layers if you choose. Another option would be to add a Teaspoon of Manuka Honey to the honey layer of your soap. No Manuka Honey? No worries. Check out our DIY Manuka Honey Recipe
Finally, the essential oil blend I used is a combination of Peppermint (refreshing and ‘my’ essential oil) and Manuka (antibacterial, anti-fungal, anti-inflammatory, relaxing scent) essential oils. If you’d like, you can replace the Manuka with Tea Tree Oil.
Tips For Layering Melt and Pour Soap
Melt and pour soap melts at about 120-125 degrees. When pouring layers it is important to remember that if the layer of soap you are pouring is too hot, it will melt the layer below it.
Make sure that the top layer has cooled to 125 ° F or below before pouring the next layer.
Because temperature is so important, I recommend investing in an *this post contains affiliate links infrared thermometer for making layered soaps. Even someone as experienced at soap making as I am can ruin a gorgeous bar of soap because I thought it was cool enough simply by touching the container.
It’s also important for the bottom layer of soap to be hard enough to support the soap layer you are pouring on top.
If it is too soft, the top layer will melt through to the bottom, no matter how much the layer you are pouring has cooled.
As the bottom layer cools and hardens, it will develop a ‘skin.’ To test the thickness and strength of the skin, gently touch the soap. If you can easily push into the soap, it needs to cool and harden longer. You don’t want this layer to set up all the way, just to be hard enough that the heat of the layer you are pouring can’t penetrate it.
Spritz the the hardened layer of soap with alcohol before you pour a new layer to help the two layers adhere better.

Simple DIY Salt Scrub Bar Ingredients
*this post contains affiliate links
1 Pound Clear Melt and Pour Soap Base
1/2 (give or take a bit) Honey Melt and Pour Soap Base
1/2 Cup Coarse and/or Extra Coarse Sea Salt (I used a combination) If you want to use Epson Salt, use the fine grain.
1 Teaspoon Refined Shea Butter
4 drops Peppermint Essential Oil and 4 drops Manuka Essential Oil PER 4 oz. BAR OF SOAP you are making.
Simple DIY Salt Scrub Bar Method
Chop your clear melt and pour base. In the microwave pulse in 30 second stints until the base is melted.
Sprinkle 1-2 Tablespoons salt over the bottom of each mold.
Pour melted clear soap over the salt.
Sprinkle 1-2 Tablespoon salt over the top of that layer of soap.
Repeat until soap mold is full, ending on a layer of clear soap.
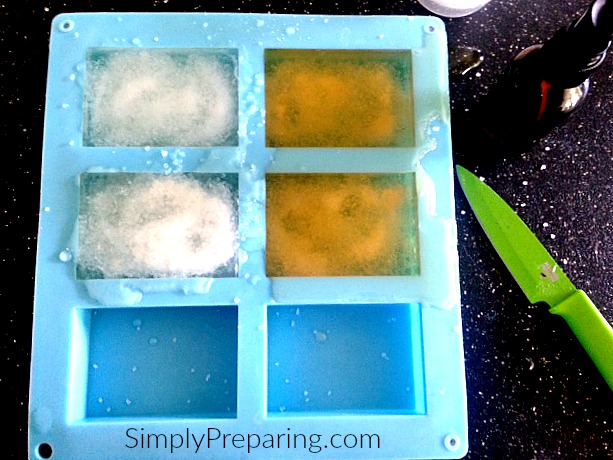
If you are making the bi-colored DIY Salt Scrub Bars, end your clear soap half with a salt layer.
Chop honey soap base into small chunks, pulse in microwave in 15 second bursts until melted.
Add shea butter and stir.
Add drops of Peppermint and Manuka essential oils. Pour a layer of the honey base over the last salt layer in your mold.
Repeat with salt and honey layers until mold is full, ending with a honey layer.
Allow your DIY Salt Scrub Bars to fully harden, turn them out and head to the tub!
Pro Tip: Usually if you are using a 4 ounce mold, a pound of soap base will give you 4 bars of soap. But because of the volume the soap will take up, you might have a bit of soap base left over. You may want to grab a small 1-2 ounce mold to use any potential left over soap base in.
More Essential Oil Recipes We Think You Will LOVE!
Homemade Organic Brown Sugar Scrub Bar