Simply Preparing

Survival blog for disaster and emergency preparedness.

  • Home
  • About Simply Preparing
  • Beginning Prepping
  • Simple & Inexpensive Prepper Projects
  • Young Living Essential Oils

Easy Homemade Nut Milk Recipe

March 12, 2018 By ParkerMama Leave a Comment

Commercial almond  milk has become a mainstay on grocery store shelves.  While  I bought it for a while, once you start making your own, you never go back.  Homemade nut milk doesn’t come with unnecessary additives known to mess with your gut.  Plus, making your own nut milk allows you to add your own choice of sweeteners if desired.  Let’s get started, shall we?

Easy Homemade Nut Milk Recipe

How Hard Is It To Make Nut Milk?

Homemade nut milk is super quick and easy.  It can also be a bit messy, but, that’s the price of this homemade goodness.

Soaking Your Nuts

Soak your nuts overnight the day before you want to make nut milk.  Soaking does a few things, including making it easier to blend the nuts and reducing the level of phytates – the plant enzyme inhibitor that stops the nuts sprouting without water, soil or sunlight.  Soaking nuts is sometimes called ‘activating nuts’ and makes them easier to digest too.

Pro Tip:  Storing your nuts in wide mouth mason jars that have been vacuum sealed with a Food Saver will keep them fresh for years.

Nut Bag for making Homemade Nut Milk

Straining Your Nut Milk

Strain your nut milk with a *this post contains affiliate links nut milk bag or cheese cloth.  I prefer a nut milk bag as I can toss it into the washing machine and reuse it for years.

If you are making cashew or pistachio milks, you won’t even need to strain them.  These milks can blend until completely smooth.

Sweeten Your Nut Milk

Another great thing about making your own nut milk is that you can choose your own sweetener, or leave it plain.  I love to use crushed vanilla beans, vanilla bean paste, dates, vanilla powder, raw honey, maple syrup, and brown rice syrup.

Equipment and nuts for making homemade nut butter.

Nut To Water Ratio for Homemade Nut Milk

Because you are making your own, you can choose how rich you would like your nut milk to be.  If you are making smoothies, wanting less calories or wanting to stretch your dollar use less nuts and more water.  If you are using your milk for coffee or ice cream, use less water and more milk.

Homemade Nut Milk Recipe

I use this recipe for almond, hazelnut, cashew, pistachio, and walnut milk.

1 Cup nuts of choice
4 Cups water

Drain and rinse the nuts you have been soaking.  Place well rinsed nuts into a high speed blender with 4 cups of water.  Blend them until they create a creamy milk.  I have a Vitamix and I go for about 2 minutes.  If you have a less powerful blender, you’ll need to blend longer.

Over a bowl, or large 8 cup Pyrex measuring cup, strain the contents of the blender through a nut milk bag or cheese cloth.  Also,  you could even use a leg from an old (but clean) pair of nylon stockings.  Then, using your hands, squeeze out as much liquid as you can.

Return the liquid (milk) back to your blender after having rinsed the blender clean.  Finally, add the sweetner of your choice, blend again until combined.

Pro Tip: Want to take your nut milk recipe to a higher standard?  I love Melissa King’s book DIY Nut Milks, Nut Butters and More:  From Almonds to Walnuts.   Melissa shares yummy recipes that can’t be found anywhere else!  Check it out.  I think you’ll enjoy it as much as I have.

What To Do With The Nut Pulp?

Take the nut pulp left in your milk bag and use it to make homemade hummus, dips or nut cheese.  You can spread out the nut pulp onto a parchment lined baking sheet and dry it in a 222 degree oven for 2 hours or until completely dry.  Use the dried nut pulp in oatmeal, granola or in baking.  Or, you can freeze the nut pulp for later use.

What do you make rather than buy from the grocery store to save money?   Have you even made homemade nut milk?

Filed Under: cooking tutorial, Food Storage Tagged With: cheese biscuit recipe, Food Saver, food storage, mason jars, prepping on a budget, save money, vitamix

Freeze Dried Meals in a Jar: Sausage Potato Soup

January 20, 2016 By ParkerMama 2 Comments

Freeze Dried Meals in a Jar provide nutrition, convenience, and long term storage ability to your food storage plan.   Boil a pot of water, dump in the ingredients, and viola!, dinner is served in record time.

Even if that dinner was made a YEAR ago!

DIY Homemade Freeze Dried Meals In a Jar: Sausage Potato Soup Recipe

Why I Love Freeze Dried Meals In A Jar

What makes Freeze Dried Meals in a Jar so fantastic?  Imagine coming home too tired to cook, and the family wanting to eat…..NOW.  You boil water.  Dump in the contents of the jar.  Stir.  Viola.  It’s dinner baby.  It’s way healthier than fast food, AND at about $10.00 a jar for a family of 4, CHEAPER too.

You are learning to use your food storage, saving money, creating shelf stable, long lasting meals for your storage, and making your life easier.   We aim to please, here at Simply Preparing.

Sausage Potato Soup Ingredients (Enough For ONE Jar)


1 C. Freeze Dried Sausage
1 C. Dehydrated Potato Chunks
1/3 C. Freeze Dried Sweet Corn
1/4 C. Freeze Dried Onions
1/3 C. Dehydrated Carrot Dices
1/3 C. Freeze Dried Peas
6 TBSP Chicken Bullion

plus:

1 TBSP Parsley
1 TBSP Garlic Powder
1/4 tsp. Salt
1/8 tsp Pepper
4 TBLS Butter Powder

These are the ingredients you will add to each mason jar.  When making this recipe, you’ll also need to create a roux to thicken the soup.  I’ll teach you how to do this below. (SO easy!)  But you will NOT add the ingredients for the roux to your mason jar.

Layer Each Ingredient Listed Above Into A Mason Jar

Individually layer each ingredient into the mason jar.  The ingredients listed above are enough for ONE jar of soup.  Want to make 12 jars of soup?  Times each ingredient by 12!

After adding the ingredients for your Sausage Potato Soup to the mason jar , you’ll also need to add an oxygen absorber to each jar or vacuum seal each jar.  Personally, I do both.  By keeping the air out, you will get  least a year’s (if not 5!) storage for this recipe.

Bring three quarts of water to a boil.  Add the ingredients of your mason jar to the boiling water.    While these ingredients simmer, make your thickening sauce.

How To Make A Thickening Sauce (Roux)

( The ingredients for the thickening sauce/roux will NOT be part of what you actually put into your jars.  These are items you’ll need to have on hand in your fridge/pantry to complete this meal.)

From your pantry grab:

1/4 Cup flour

1 C  milk or reconstituted Powdered Milk

2 TSPB Butter

Melt butter in a small pan over a low temperature.  Whisk 1/4  C. flour and allow to cook for a minute, whisking constantly.   Pour in 1 C. milk.  Stir until thick and bubbly.

Once Your Roux Is Ready

Next, add a bit of your soup liquid to your thickening sauce to thin it out some.  Then add everything back into your soup and stir.  Allow to simmer for a few minutes before serving with a garnish of  Freeze Dried Parmesan Cheese.  Devour!

Ready to try Thrive?

I would love it if you bought using my link so I can grow my food storage as well.  Than you!

Buy Thrive Freeze Dried Foods

Beans And Rice Are Nice

Beans and rice might keep a body and soul together, but they are not going to be able to do much when food fatigue sets in. It is important to stock a variety of foods, especially ingredients for meals that are tried and true family favorites.  That’s where Freeze Dried Meals in a Jar come into play.

Have you ever created shelf stable freeze dried meals in a jar?   What are your family’s favorites?

Filed Under: Food Storage Tagged With: dinner's in the jar, DIY Freeze Dried MREs, Food Saver, food storage, freeze dried food, frugal living, how to make a roux, Meals in a jar, oxygen absorbers, powdered milk, prepper, thickening sauce, Thrive, Toscana Sausage Potato Soup

How To Freeze Eggs

March 22, 2013 By ParkerMama 4 Comments

Remember the good old days when eggs used to go on sale for .25 .50 a carton?  In my area we’re  lucky if we see .99 a dozen.   Eggs have gone up in price, which makes knowing how to freeze eggs an excellent skill to master.

How To Freeze Eggs


When To Use Frozen Eggs

Eggs that have been frozen are good for baking and recipes such as waffles and pancakes.   Frozen eggs tend to be a little rubbery for scrambled and other egg dishes, but if you want to give them a try, well, you only live once, right?


How To Freeze Eggs:

1. Crack your eggs into a bowl and whisk them.  You aren’t trying to make them light and fluffy with lots of air, as a matter of fact, the less air the better.  You just want the white and yolk well mixed.

2. Put about 3 T of your egg mixture into an ice cube tray.  I used *this post contains affiliate links baby food trays because I know that they are BPA free.

3.  Stick your tray of eggs into the freezer and let them freeze.

Freezing eggs in ice cube trays

4.  After they are frozen, pop them out double bag them zip-lock bags, and stick them back into the freezer.  DATE YOUR BAG and write down HOW MANY CUBES MAKE AN EGG.  You may THINK you will remember this, but you won’t.  Trust me. (ahem)  Eggs are good for about 6 months when packaged this way.

These eggs should last up to a year in your freezer if you use your Food Saver and seal them in Food Saver bags. 

5. Speaking of how many cubes equal and egg…..two ice cubes is about 1 egg.  Just remember how many eggs you mix, and how many ice cube trays it fills up to figure out the cube per egg ratio.

Defrost as many ice cube eggs as you need for your recipe.  Don’t microwave them to defrost them because you will start to cook them.  Use your defrosted eggs right away.

Freeze Eggs In Muffin Tins

I used to do this in tin muffin containers.  But I now use these silicone muffin pans and will NEVER go back.  So much easier to pop out!  I think you’ll love them too.

1.  Crack eggs into bowl
2. Lightly scramble eggs
3. Pour into your silicone muffin tins and freeze!

Freeze Eggs In Ready To Eat Breakfast Meals

My family enjoys being able to grab a breakfast burrito or egg muffins out of the freezer, pop it in the microwave to warm it up, and head out for the day.  Don’t forget breakfast casseroles, like this one from Pocket Change Gourmet 

Shelf Stable Eggs

Freezing eggs not really your thing?  Worry not!  There excellent shelf stable eggs available in both powdered eggs and freeze dried eggs are a great choice.    Easy to add to your baking or scramble up for a quick breakfast!  Another family favorite are the Scrambled Eggs With Bacon from Mountain House.   Remember, eggs are an important part of both your long term, and short term food storage plan.

Yes! You CAN freeze eggs! Here's how!

Do you freeze eggs? How do you preserve your surplus of eggs?

Filed Under: Food Storage Tagged With: 3 month food storage plan, eggs, Food Saver, freezer meals, prepping, seasonal preps

Prepping on a Budget: Group Co-ops
January 16, 2013 By ParkerMama 13 Comments

One of the tips you’ll hear the most when trying to save money on food is to buy in bulk.  As a rule purchasing in bulk is a good strategy for prepping on a budget, but you need to be careful and compare  per ounce prices.   You can beef up your savings when prepping on a budget by putting together  group co-ops.

How to use Group Co-ops when Prepping on a Budget

Now when I mention group co-ops people think of already existing group co-ops like Azure Standard or something along those lines.  I’ve ran many a co-op in my time, and truth be known, co-ops come in all shapes and sizes.

Bulk Nuts Vacuum sealed with a FoodSaver

Recently a friend of mine contacted a local nut company and asked how big of an order was required to get their discount price.  A discount price is often not as low as a wholesale/resale price because a company requires a wholesale business number to sell at that price.  But a discount price is much lower than a sale price and makes it worth the time to co-ordinate orders with a group of other like minded people.

You can run group co-ops for all sorts of things from food to tangibles like grain grinders, water purifiers, etc.  It’s not hard.  Just give a company a call, ask if they would be willing to participate in your co-op.  Many grocery stores are willing to order in larger quantities of items for discount prices.

Where to find Group Co-Op Opportunities when Prepping on a Budget

Azure Standard

Walton Feed

Emergency Essentials

Local suppliers of fruits, veggies, nuts, etc.

Local health food stores.

Local grocery stores.

The worst that can happen is for someone to tell you no.  Big deal.  Scratch them off your list and move on to the next name.

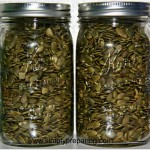
Bulk Purchased Pumpkin Seeds Vacuum Sealed with a Food Saver

Back to our local nut co-op.  I purchased about 50 pounds of different kinds of nuts and seeds.  All at about a 30-40% discount.   It was awesome.  And easy.  And totally worth the time to bag up all those orders.

How to Store Nuts When Prepping on a Budget

I used to pour them in Mason jars and then stick ’em in my freezer.  But that didn’t leave a lot of room for great stock up deals on meat and the like.

vacuum sealing nuts in a Mason jar with my Food Saver

Using my FoodSaver to vacuum seal nuts in  Mason jars allows the nuts to last without having to take up precious freezer space, makes life so much easier!   I have almonds I purchased and vacuumed sealed two years ago that are still fresh!   Just make sure the tops stay sealed.  If one top comes unsealed, simply vacuum seal it again.  No biggie.

Food Savers Make Prepping on a Budget Super Easy!

It’s super easy! Looking at the picture above, you can see that I have the wide mouth jar sealer on my wide mouth jar, on which I’ve already placed a wide mouth lid. No ring needed right now. Just the jar and the lid.

Then I pulled out the accessory tubing from my FoodSaver and connected it to the top of the wide mouth jar sealer.  I pressed the button that starts the vacuum sealing process. It stops on it’s own when it’s done!

FoodSaver gives you the option of using regular mouth sized jars too. Just make sure you have the sealer for the regular mouth jars. Personally, I prefer the wide mouth jars, but the instructions will remain the same.

According to the manufacturer, the FM5000 Series of FoodSavers is compatible with jar sealers and any other FoodSaver container or accessory.

You will also need the regular and wide mouth FoodSaver jar sealers.

Prepping on a Budget using Mason Jars!

When you vacuum seal in mason jars, you can use any size from pint to quart to (my favorite!) half gallon jars! And, you can open and reseal them as many times as you would like. Score!

Vacuum Sealing is an excellent way to store legumes, rices, grains, raisins, and….well, the sky is kind of the limit here!

Anyone else prepping on a budget and using group co-ops to increase their purchasing power?  I’d love to hear about your experiences!

Filed Under: Simple & Inexpensive Prepper Projects Tagged With: Food Saver, group co-ops, prepping on a budget

Simple & Inexpensive Preps

WHAT Is A Boil Water Notice How Can You Survive It_

How To Survive A Boil Notice

A boil notice is issued when a municipal water provider detects dangerous pathogens and microorganisms in the water that can make us sick.  Other ...continue reading

Privacy Policy and Cookies

This site uses cookies. Please read our Privacy Policy so you fully understand how we use them.

Affiliate Disclosure

We are a participant in the Amazon Services LLC Associates Program, an affiliate advertising program designed to provide a means for us to earn fees by linking to Amazon.com and affiliated sites.

Emergency Planning Basics

Calculating Drinking Water Storage Needs
Breaking Down Prepping Into Small Chunks
Family Emergency Plan Series

Food Storage

Ham and Cheese Egg Muffin Recipe

Ham and Cheese Egg Muffin Recipe

We are grab and go breakfast people at our house.   Since my kids were little,  the best way to make sure everyone at my house got a good breakfast was to have ready made items like muffins, stashed away in the freezer.  Luckily, this Ham and Cheese Egg Muffin Recipe is super easy to make […]

Surviving In Style

Why There Must Be An Israeli Bandage In Every Emergency Kit

An Israeli Bandage In Every Emergency Kit

The Israeli Bandage  was created by the Israeli Defense Force to save lives during combat. The pressure applicator on an Israeli Bandage exerts 30 ...continue reading

Alternate Uses

Diatomaceous Earth Uses

Diatomaceous Earth Uses And Benefits

Have you ever heard of diatomaceous earth?  No?  Then today is your lucky day.  Read on to discover  diatomaceous earth uses to benefit your home, ...continue reading

Why Worry About Preparing?

Preparedness for a disaster makes a lot of sense. With recent and predicted events like Hurricane Sandy, The Colorado Wildfires, Fiscal Cliffs, and rising food and gas costs just in 2012 there is no denying that things are changing in our world. Whether or not you believe "The End of the World As We Know It" is near there are plenty of everyday things to worry about: loss of a job, health emergency, local weather events to name a few.

I find that I worry less about the big "what if's" out there the more emergency planning my family does to deal with the unexpected. I will share the survival tips and tricks I have learned while on this preparedness journey and hope that you join in with lots of comments. We all have a lot to learn from one another.

Now, lets get started prepping! Pick a post and start reading. At the end of every post the blog randomly selects three more survival posts for you to check out. Set aside 10 minutes a day to build your preppers knowledge base. We can never be done learning or prepping, right?

Things To Know

  • Advertising
  • Privacy Policies

Copyright © 2017 BAL Creative, LLC: Simply Preparing Disaster and Emergency Preparedness · WordPress · Log in